Relying strictly on spec sheets traps many display buyers. Maximum brightness numbers alone only tell half the story. You must verify how a screen adapts to changing environmental light. Improper dimming causes massive headaches for operators. It sparks municipal fines for nighttime light pollution. It accelerates LED degradation rapidly. It also wastes immense energy during off-peak hours, especially as seasons change and sunsets occur earlier. You need a practical way to verify actual performance before purchasing. We present a standardized, skeptical testing framework below. You will learn how to evaluate suppliers using real-world sensor data. This approach replaces controlled, unrealistic showroom demonstrations. We cover critical steps ranging from high noon glare tests to nighttime compliance checks. Follow this comprehensive guide to ensure your new display performs flawlessly around the clock in any weather condition.
Key Takeaways
- An effective outdoor digital signage display must balance peak sunlight readability with strict night-time dimming compliance.
- Supplier demos must be moved out of the showroom; true evaluation requires testing the day night brightness transition under variable, real-world lighting conditions.
- Smooth, curve-based dimming is a mandatory requirement over jarring, stepped brightness adjustments.
- Sensor placement and polling rates dictate how effectively a screen reacts to sudden environmental changes (e.g., cloud cover or passing vehicles).
The Business Case for the Day Night Brightness Transition
Municipalities increasingly enforce strict "nit limits" for nighttime digital displays. Managing the day night brightness transition properly is essential for legal operation. Failure to automate this transition risks operational shutdowns. It also triggers recurring fines from local zoning boards. Regulatory bodies often follow guidelines from the Illuminating Engineering Society (IES) regarding safe roadside luminance. You must align your hardware capabilities to these standards.
Fixed-brightness screens waste significant power during overcast days and evenings. Intelligent auto-dimming directly correlates to return on investment through immediate energy savings. Reducing power draw during off-peak hours cuts operational expenses dramatically. You keep utility bills low without sacrificing audience engagement.
Forcing LEDs to run at maximum capacity 24/7 accelerates diode degradation. Intelligent dimming preserves color uniformity over the long term. It extends the operational life of the entire module significantly. Diodes running at cooler temperatures maintain their brightness ceiling years longer than over-driven counterparts.
Brand perception heavily depends on appropriate brightness. A screen glowing blindingly bright at night creates a public nuisance. It angers local residents and distracts drivers. Conversely, a screen appearing too dim at noon damages campaign visibility completely. You must balance both extremes to maintain positive audience interactions and high advertiser satisfaction.
![Outdoor Digital Signage Auto Dimming Test Setup]()
Setting the Baseline for Your Outdoor Digital Signage Display Demo
Evaluating an outdoor digital signage display demands realistic testing conditions. You must reject the indoor showroom entirely. Showrooms have stable, artificial ambient lighting. They rarely exceed 1,000 lux. Direct sunlight easily hits 100,000 lux. You cannot validate performance in a controlled room. Insist the supplier performs the demo outdoors. If they cannot, require an industrial warehouse environment simulating massive lux variations accurately.
Request comprehensive documentation on ambient light sensor placements. The display's own bezel must never shade the sensor. Nearby mounting structures should not obstruct natural light paths either. Review the controller card’s native dimming capabilities before the physical demonstration begins. You need to know exactly what the hardware claims to support.
Ensure the supplier provides full access to the backend content management system (CMS). You need to verify how dimming thresholds operate manually. Compare these scheduled settings against fully automated sensor reactions. Observing the software interface proves the system relies on genuine sensor data rather than pre-programmed parlor tricks.
Best Practices for Baseline Setup
- Review sensor placement blueprints before authorizing the physical test.
- Confirm the CMS interface allows custom dimming curves and hysteresis adjustments.
- Refuse testing if suppliers block access to backend diagnostic software during the demo.
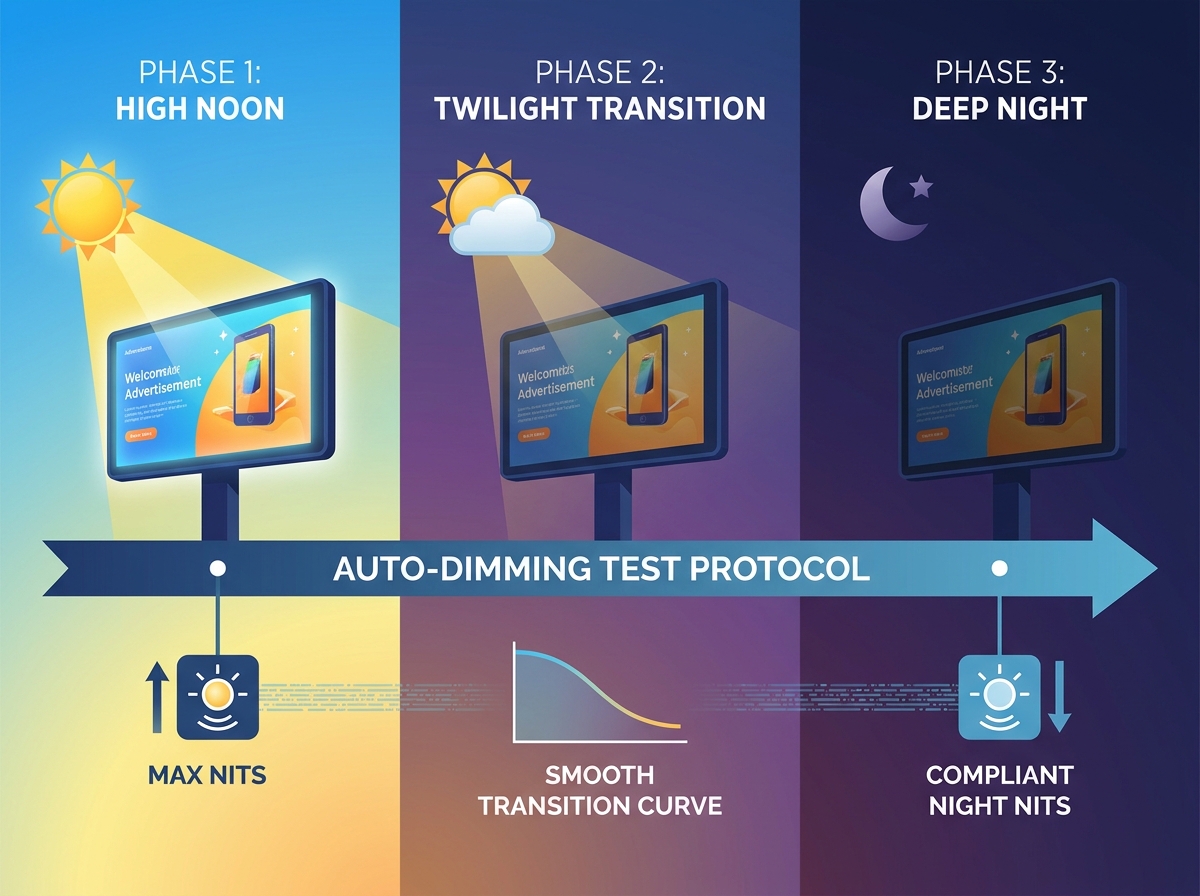
The 3-Phase Sunlight Readable Display Demo Protocol
A rigorous sunlight readable display demo requires three distinct testing phases. You must push the hardware to its absolute limits across the entire lighting spectrum.
Phase 1: High Noon / Direct Glare Test
The core objective involves verifying maximum nits and contrast ratios under direct sunlight. You want to see how the system handles extreme solar loading.
Shine a high-powered localized light source directly at the sensor and the screen surface. Do not use a standard consumer flashlight. You need an industrial spotlight generating massive lux to mimic peak solar glare accurately.
Success occurs when content remains completely legible without color washout. The system must reach its advertised peak brightness quickly. It must sustain this output without triggering thermal throttling warnings or forcing an emergency cooldown cycle.
Phase 2: The Twilight / Overcast Simulation
This phase tests the calibration curve specifically. You are evaluating how smoothly the system interprets decreasing ambient light.
Gradually reduce the ambient light source over a 5-minute window. This slow reduction simulates dusk or rolling cloud cover. It forces the light sensor to send continuous micro-adjustments to the controller card.
The display must dim incrementally and gracefully. Look for smooth curve adjustments. Avoid systems showing harsh, noticeable "steps" distracting viewers. Stepped dimming looks unnatural and indicates cheap controller architecture.
Phase 3: The Deep Night / Low-Light Compliance Test
Your objective here is verifying the minimum brightness floor and checking for light bleed. Nighttime performance dictates regulatory compliance.
Remove all ambient light entirely. Plunge the testing environment into total darkness.
Success means the screen drops to municipal-compliant levels automatically. This often requires hitting 300 to 500 nits. The screen must retain grayscale accuracy and deep color saturation. Black backgrounds should never exhibit glowing "halos" or pixelated artifacts at minimum brightness.
3-Phase Dimming Demo Protocol Summary | Phase Name | Target Lux Environment | Duration | Primary Success Metric |
| Phase 1: High Noon | 80,000+ Lux | 15 Minutes | No thermal throttling; Zero color washout. |
| Phase 2: Twilight | Descending to 5,000 Lux | 5 Minutes | Smooth dimming curve; No harsh steps. |
| Phase 3: Deep Night | Sub 100 Lux | 10 Minutes | 300-500 nits floor; Perfect grayscale retention. |
Measuring Advertising Screen Light Sensor Response Times
Testing the advertising screen light sensor response exposes poor software logic instantly. Real-world environments contain highly unpredictable light shifts. The system must differentiate between permanent weather changes and temporary environmental noise.
First, perform the "Passing Truck" shadow test. Block the light sensor abruptly using a solid object. This simulates a temporary shadow, much like a commercial bus parking in front of the sign. The screen should not react immediately. It needs to wait and confirm the shadow is permanent.
Next, evaluate the polling rate algorithm. Professional software includes a built-in delay called hysteresis. It usually lasts 5 to 15 seconds. If the screen dims instantly when a bird flies by, the polling rate is configured poorly. Erratic flickering ruins the viewer experience and damages brand perception.
Finally, execute the headlight glare test. Flash a bright light directly at the sensor while the testing environment remains dark. The system must filter out these transient light spikes intelligently. Passing car headlights should never cause the screen to ramp up blindly. It must maintain its low-light compliance floor despite temporary flashes.
Common Mistakes in Response Testing
- Testing sensor response times using mere seconds instead of sustained minutes.
- Ignoring the physical angle of the incoming light spike during the headlight test.
- Forgetting to test multiple sensors simultaneously if the cabinet uses a dual-sensor array.
4 Red Flags to Watch for During an Outdoor Screen Auto Dimming Test
Conducting a thorough outdoor screen auto dimming test reveals hidden hardware flaws quickly. You must remain vigilant during the supplier demonstration. Watch out for these four critical warning signs. They indicate inferior components or lazy software engineering.
Red Flag 1: Stepped Dimming Only. If the supplier’s software only allows 3 to 4 rigid brightness levels, reject the solution. Options artificially locked at 100%, 75%, 50%, and 25% look terrible in practice. The transition feels jarring to audiences. You need seamless curve adjustments operating across 100 distinct granular levels.
Red Flag 2: Poor Sensor Placement. Sensors embedded too deeply into the cabinet fail constantly. They register artificial shadows created by the display frame itself. Bottom-edge sensors pose similar risks. They easily gather snow, dirt, or vandalism damage. Sensors belong near the top edge, featuring clear, unobstructed sightlines.
Red Flag 3: Loss of Grayscale at Low Brightness. Cheaper Integrated Circuit (IC) drivers drop crucial color data when the screen dims. They lack the processing power to maintain depth at 10% brightness. This results in heavily pixelated or "blocky" nighttime images. Deep shadows turn into ugly gray squares.
Red Flag 4: "We Can Fix It In Software." Hardware sensors must react smoothly during the live demo. Do not accept promises of future firmware patches. If the dimming fails today, it will fail in the field tomorrow. Base your purchasing decisions strictly on current, demonstrable functionality.
Auto-Dimming Hardware Performance Comparison | Feature Category | Ideal Performance Standard | Poor Performance (Red Flag) |
| Dimming Curve | Smooth, gradual 100-level adjustment | Rigid, noticeable percentage steps |
| Delay Logic (Hysteresis) | 5 to 15-second built-in delay buffer | Instant, hyper-reactive flickering |
| Grayscale Retention | High PWM frequency maintained at low nits | Pixelated, washed-out shadows at night |
| Sensor Location | Top bezel, flush, unobstructed view | Bottom frame, recessed deeply into casing |
Post-Demo Shortlisting: Next Steps for Procurement
A successful physical demo requires structured follow-up actions. You cannot make a final purchasing decision based on visual observation alone. You must validate your field notes against binding legal documentation.
Compare your observed demo results against the supplier's stated spec sheet rigorously. Note any discrepancies in minimum dimming levels or contrast retention carefully. If the spec sheet claims a 300-nit minimum floor, but the demo unit stalled at 800 nits, you have a major compliance risk.
Evaluate the warranty terms thoroughly. Read the fine print carefully. Check if the warranty covers the ambient light sensors and IC drivers specifically. These components represent critical points of failure for auto-dimming features. Some manufacturers exclude exterior sensors from standard coverage due to weather exposure.
Request a pilot program for multi-screen rollouts. Negotiate a 30-day single-unit pilot installation. This allows you to test the auto-dimming against actual seasonal light shifts. It also satisfies local zoning inspectors before you authorize a massive capital commitment.
Procurement Action Checklist
- Cross-reference all field test data against official specification sheets.
- Isolate warranty clauses covering sensor replacements and labor costs.
- Deploy a single-unit pilot for real-world seasonal and municipal testing.
- Verify the supplier provides ongoing backend CMS support for curve calibration.
Conclusion
Validating auto-dimming is not a secondary technical check. It acts as a primary compliance and operational necessity for modern operators. Executing a structured, day-to-night physical testing protocol provides absolute clarity. Buyers strip away marketing claims rapidly using this method. It exposes the actual hardware limitations of the display module. Use this exact demo plan to build a resilient shortlist of vendors. You will quickly identify suppliers prioritizing intelligent engineering over brute-force brightness. Protect your capital investment by demanding verified, real-world performance every single time.
FAQ
Q: How many nits does an outdoor digital signage display need at night?
A: Most municipal zoning laws require outdoor screens to dim to between 300 and 500 nits from sunset to sunrise to prevent light pollution and traffic hazards.
Q: Why does the screen look pixelated when it dims?
A: This occurs when the display uses low-quality driving ICs. High-quality displays utilize PWM (Pulse Width Modulation) to lower brightness while maintaining a high grayscale depth, ensuring the image remains crisp even at 10% brightness.
Q: Should auto-dimming be controlled by hardware sensors or software schedules?
A: The best practice is a hybrid approach. Hardware ambient light sensors should handle real-time micro-adjustments (like sudden rainstorms), while software scheduling sets maximum brightness ceilings based on the time of day and seasonal sunset changes.
Q: How do you prevent car headlights from tricking the light sensor at night?
A: Industrial-grade signage controllers use "hysteresis" or a timed-delay algorithm. The sensor must read a sustained increase in light for a set duration (e.g., 10-20 seconds) before raising the screen brightness, ignoring brief flashes from headlights.