Procuring commercial-grade outdoor displays represents a major capital expenditure for any organization. These investments promise high visibility and dynamic engagement. However, failing to plan the physical infrastructure prior to installation severely inflates operational budgets. Overlooking cable routing leads to compromised IP ratings. You also risk serious thermal throttling issues during peak summer months. Furthermore, poor planning forces you to hire costly two-person crews for routine maintenance. You need a robust deployment strategy to avoid these pitfalls. We built this guide to provide a clear technical framework. AV integrators, IT directors, and facility managers can properly evaluate infrastructure requirements for wall mounted outdoor digital signage. You will learn how to prepare effectively before breaking ground or drilling masonry. Proper foresight eliminates unexpected downtime. It also guarantees seamless operation in harsh, unpredictable environments. Protect your hardware investment by mastering these pre-installation fundamentals.
Key Takeaways
- Bottom-entry cable routing with drip loops is non-negotiable to prevent capillary water ingress and protect display warranties.
- Calculating precise external display maintenance clearance eliminates "remove-to-repair" scenarios, drastically reducing hardware downtime.
- Deploying specialized, outdoor-rated articulating mounts secures critical wall bracket service space, enabling single-technician rear access.
- Evaluating vendor solutions requires aligning physical dimensions with local building codes, ADA protrusion limits, and wind-load ratings.
The Business Impact of Overlooking Physical Infrastructure
High-spec hardware often fails because of low-spec installation planning. You might purchase a premium 4K display engineered for extreme weather. However, if the mounting and cabling infrastructure falls short, the screen will inevitably fail. Installation oversight is the primary reason expensive outdoor screens underperform. We frequently see pristine displays ruined by easily preventable water damage or heat stress.
Improper cable gland sealing serves as the leading cause of moisture ingress. Installers sometimes leave gaps in the conduit connections. Water creeps into these gaps over time. This moisture shorts out internal power supplies and logic boards. Manufacturers rigorously inspect returned units. They will immediately void your warranty if they detect improper cable sealing. You carry the financial burden of replacing the entire unit.
Labor cost escalation presents another massive risk. Many organizations mount screens flush against a wall without considering future repairs. A simple component swap suddenly requires heavy equipment. You must rent a scissor lift. You need multiple technicians to physically dismount the heavy screen. This extends system downtime from a few minutes to several days. Hardware repairs should never require structural demolition.
A successful deployment allows for single-technician servicing. You must ensure zero water ingress at all connection points. The installation must also provide unobstructed thermal exhaust. Achieving these criteria guarantees your signage runs reliably year after year. Proper planning shifts your focus from emergency troubleshooting to content strategy.
![Installation of wall mounted outdoor digital signage displaying cable entry details]()
Engineering Weatherproof Screen Cable Entry
Ingress protection at the connection point dictates the lifespan of your deployment. A display might carry an impressive IP56 or IP68 rating out of the box. That rating becomes irrelevant if the cable entry point is compromised during installation. The weakest link always determines the true weather resistance of the system. You must treat the entry cavity as a critical vulnerability.
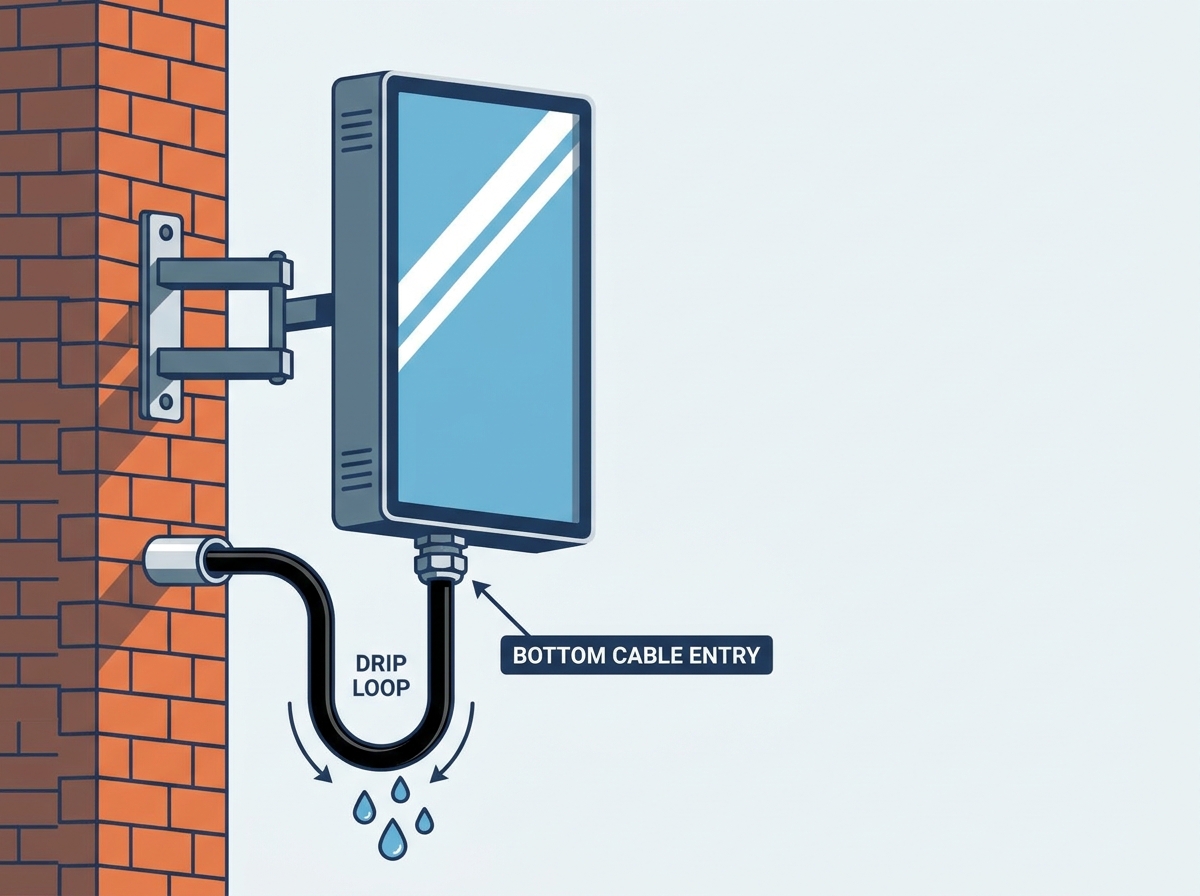
You must adopt mandatory routing practices to protect the hardware. First, enforce a strict bottom-entry only policy. Never route cables through the top of an enclosure. Standing water pools on flat top surfaces. Gravity will inevitably pull that water down through any top-mounted seals. Second, mandate the inclusion of drip loops. A drip loop forces condensation to gather and drip off the bottom curve of the wire. This simple technique stops water from sliding directly into the hardware connections. Properly engineered weatherproof screen cable entry is your primary defense against rain and humidity.
Evaluate vendor hardware meticulously. Look for enclosures equipped with robust compression glands. Avoid displays relying on basic rubber grommets. Rubber degrades rapidly under continuous UV exposure and temperature fluctuations. A proper IP-rated compression gland tightens around the cable jacket. This creates an impermeable, mechanical seal capable of withstanding heavy storms.
Finally, plan separate conduit paths for high-voltage power and low-voltage data. Running 120V power lines directly alongside HDMI or Cat6 cables introduces severe electromagnetic interference (EMI). EMI degrades video signals and causes intermittent screen flickering. Isolate these cables in separate rigid conduits to maintain pristine image quality.
Common Installation Mistakes to Avoid:
- Using indoor-rated PVC conduit in outdoor environments prone to freezing.
- Pulling cables too tight, entirely eliminating the necessary drip loop.
- Applying standard silicone caulk instead of using threaded compression glands.
- Failing to plug unused cable entry ports on the display chassis.
Calculating External Display Maintenance Clearance
High-brightness outdoor displays generate substantial heat. They often push 2,500 to 4,000 nits of brightness to combat direct sunlight. This intense output creates a massive thermal load. Starving the display of airflow accelerates internal degradation. Liquid crystal panels turn black when they overheat. Internal power supplies also burn out prematurely without proper ventilation.
You must define strict clearances to enable convection cooling. Standard industry guidelines require perimeter gaps. Leave a minimum of 4 to 6 inches of open space on the top, bottom, and sides of the unit. Furthermore, you must establish an adequate wall standoff. This is the minimum distance between the back of the screen and the mounting surface. Pushing a hot screen flush against a brick wall traps exhaust heat. This creates a dangerous thermal pocket.
Establishing adequate external display maintenance clearance heavily impacts serviceability. Technicians need physical room to work. They must use diagnostic tools and visually inspect exhaust fans. They should accomplish this without completely unmounting the heavy unit. Sufficient clearance eliminates blind spots. It allows IT teams to spot debris buildup or insect nests before they cause hardware failure.
Table: Suggested Minimum Clearances for Convection Cooling
| Display Size (Diagonal) | Top & Bottom Clearance | Side Clearance | Rear Standoff (Wall Gap) |
| 43 to 49 inches | 4.0 inches | 3.0 inches | 2.5 inches |
| 55 to 65 inches | 6.0 inches | 4.0 inches | 3.0 inches |
| 75 to 85 inches | 8.0 inches | 6.0 inches | 4.0 inches |
Selecting Hardware for Outdoor Monitor Rear Access
Evaluating mounting brackets based on service accessibility is critical. You generally choose between fixed mounts and articulating mounts. Fixed mounts have a lower upfront cost. They keep the screen tight to the wall. However, they are a logistical nightmare for repairs. Articulating or scissor-style outdoor mounts cost more initially. Yet, they pay for themselves during the very first service call. They eliminate the need for secondary lifting equipment.
We strongly recommend deploying systems that facilitate outdoor monitor rear access. Choose mounts engineered to extend outward and lock into place safely. This movement creates a secure working envelope for the technician. They can reach the media player, swap cables, or clean the air filters easily. Ensure the mount specifies adequate wall bracket service space. Technicians need enough depth to insert standard tools, power drills, and remove large internal components without scraping their hands against the masonry.
You must rigidly verify load and wind ratings. Outdoor mounts endure brutal environmental stress. Wind creates a powerful sail effect on a large 55-inch or 75-inch display. This sheer force easily bends cheap steel. Verify your articulating mounts are explicitly rated for outdoor use. They must feature advanced corrosion resistance. Look for hot-dipped galvanized steel or heavy zinc plating. Standard powder-coated indoor mounts rust rapidly. Finally, ensure the hardware passes local wind-load compliance tests when the arms are fully extended.
Security, Safety, and Compliance Considerations
Physical installation must strictly align with regional safety laws. In the United States, ADA (Americans with Disabilities Act) compliance is non-negotiable for pedestrian zones. The ADA specifies a strict protrusion limit. For any object mounted between 27 inches and 80 inches off the floor, it cannot project more than 4 inches into a walkway. You must carefully calculate the combined depth of your mount and the display chassis. Recessing the display into a wall alcove often solves this depth issue.
Vandalism and tamper mitigation require aggressive planning. Outdoor displays attract curious pedestrians and malicious actors. Assess padlock compatibility on all articulating mounts. You must secure the scissor mechanism. This prevents unauthorized individuals from pulling the screen away from the wall. Pay attention to your cable conduits. Ensure all exposed wiring runs through rigid, galvanized steel conduit. Standard exposed PVC shatters easily upon impact and cracks during freezing weather.
Electrical code baselines dictate the safety of your power delivery. Ensure all planned conduit runs align with NEC (National Electrical Code) standards for wet locations. You must implement localized disconnect switches. A disconnect switch allows a technician to cut power immediately at the screen location during an emergency. Establish robust grounding protocols to protect against lightning strikes. An ungrounded outdoor screen acts as a massive lightning rod, risking catastrophic electrical fires.
Shortlisting and Next Steps
You need a comprehensive pre-installation checklist to avoid costly surprises. Do not finalize any hardware purchase until you complete a physical site survey. An engineer must confirm the structural integrity of the mounting wall. Drywall over metal studs cannot support an articulating 85-inch outdoor display. You must locate solid masonry, concrete, or reinforced steel backing. Map out the exact conduit routing paths. Measure the available clearance dimensions to ensure they meet the manufacturer’s cooling requirements.
Vendor alignment prevents physical mismatches on deployment day. Require your hardware vendors to provide detailed mechanical drawings. You need CAD files or precise PDFs. These documents must outline exact cable entry locations on the chassis. They must also detail the required structural clearances prior to procurement. Knowing exactly where the conduit meets the display allows your electricians to drill precise wall penetrations.
We offer one piece of highly actionable advice. Engage a certified AV integrator early in the evaluation phase. IT directors know networks, and facility managers know buildings. However, merging these two domains requires specialized AV knowledge. An integrator bridges the gap between digital signage selection and harsh architectural realities. They spot conduit routing errors and wind-load liabilities long before you drill the first hole.
Conclusion
Long-term ROI on outdoor digital signage hinges heavily on installation foresight. Buying the brightest, most rugged screen is only half the battle. The physical infrastructure supporting that screen dictates its true operational lifespan. Haphazard mounting leads to overheating. Poorly sealed conduits invite destructive water ingress.
Prioritizing proper cable management and ensuring comfortable rear access transforms a potentially volatile deployment into a stable asset. By securing dedicated service space, you eliminate the need for heavy lifting equipment during routine repairs. Implement robust, weather-resistant structural mounts. Calculate your cooling clearances accurately. Following these technical steps guarantees your communication asset remains vibrant, reliable, and easily maintainable for years to come.
FAQ
Q: How much clearance is typically required behind an outdoor digital display?
A: While specific manufacturer guidelines vary, a minimum of 2 to 4 inches of rear clearance is standard for passive cooling. Articulating mounts naturally dictate a slightly deeper profile when collapsed. Always consult the specific mechanical drawings of your model to ensure adequate convection airflow.
Q: Can we route cables through the wall directly behind the display?
A: Yes, provided the entry hole in the masonry is properly sealed. The display's cable entry glands must align perfectly with the wall penetration. This alignment allows for a tight, weatherproof connection, which is often facilitated by installing a recessed back box in the wall.
Q: Are indoor articulating mounts safe to use for outdoor digital signage?
A: No. Indoor mounts lack necessary anti-corrosion treatments, UV-resistant plastics, and mechanical rigidity. They cannot withstand sustained wind loads. Using an indoor mount outside introduces severe safety liabilities, including the risk of the heavy display falling in public spaces.
Q: What is a drip loop and why is it necessary for outdoor screens?
A: A drip loop is a downward U-shaped bend in a cable just before it enters the display. It uses gravity to direct water condensation or rain runoff away from the electronic connection points. This simple physical loop prevents moisture from traveling into the chassis via capillary action.