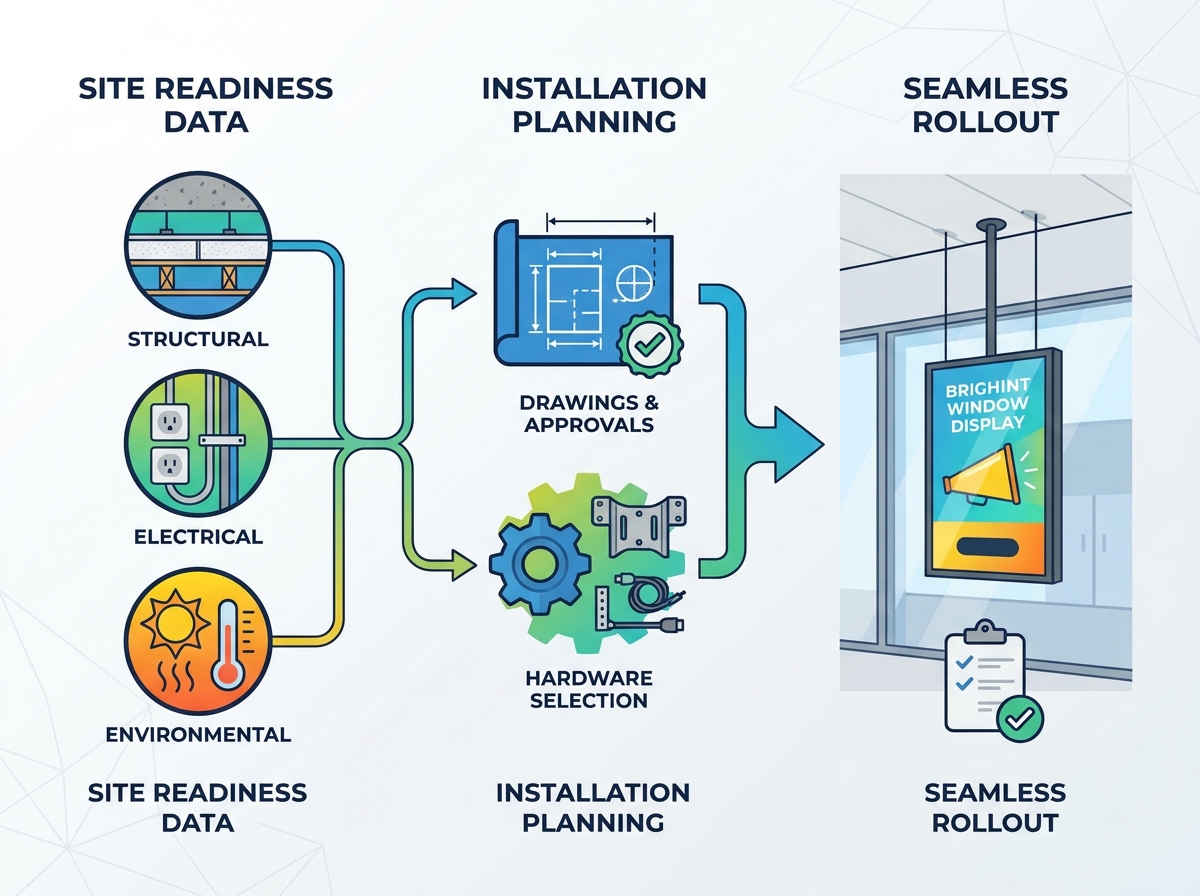
Purchasing a high-brightness screen is only the first step. The highest risk of budget overruns actually occurs on installation day. When AV installers arrive at a retail location to mount a hanging window display, an unprepared site presents major risks. It leads to aborted installations, compromised aesthetics, or severe safety code violations. You cannot leave these logistical details to chance. To ensure a seamless rollout without return-trip fees, retail project managers must act early. You must provide installers with specific structural, electrical, and environmental data long before they step foot on the premises. This guide reveals exactly what your integration team needs to succeed. You will learn how to map ceiling structures, plan clean cable routes, and manage thermal variables effectively. Proper planning bridges the gap between hardware procurement and flawless execution. This meticulous preparation ensures your storefront advertising goes live exactly as scheduled.
Key Takeaways
- Structural verification is non-negotiable: Installers need to know the ceiling composition to select the correct load-bearing hardware.
- Power mapping prevents visual clutter: Pre-planned electrical drops are required for clean suspended display cable routing.
- Documentation drives approvals: Accurate storefront installation drawings prevent friction with property management and local code enforcers.
- Thermal spacing matters: Clearance between the screen and the glass dictates the lifespan of the display due to solar heat gain.
The Hidden Costs of an Unprepared Storefront
When planning a digital signage rollout, project managers often overlook site readiness. They focus heavily on content creation and hardware selection. However, failing to prepare the physical storefront creates immediate financial risks. If an installation crew arrives and cannot complete the job, you still pay their hourly minimums. These truck-roll fees add up quickly across a multi-store rollout.
You also face the hidden cost of delayed promotional campaigns. Launching a new product requires synchronized marketing across all channels. A dark or missing window screen ruins this alignment. Your localized marketing strategy loses its most visible asset. Furthermore, an unprepared site risks accidental damage to existing window tinting, mullions, or surrounding architecture.
A successful deployment relies on a few strict success criteria. We define success using the following metrics:
- Zero return visits from the AV integration team.
- Zero visible cabling hanging behind the hardware.
- Total compliance with landlord and property management guidelines.
Achieving these criteria requires understanding implementation reality. Installers are highly trained AV technicians, not general contractors. If your site requires unexpected drywall removal, the installation halts immediately. If they discover they need electrical trenching upon arrival, they will pack up and leave. They do not carry the licenses or permits to perform structural building modifications. You must handle all structural prerequisites before the AV team arrives.
Assessing Structural Readiness for a Ceiling Mounted Retail Screen
Evaluating ceiling composition comes first. You cannot mount heavy electronics without knowing exactly what supports them. You must differentiate between drop ceilings (acoustic tiles), exposed open-joist ceilings, and solid concrete slabs. Each surface demands highly specific preparation and unique hardware.
Your ceiling type dictates the specific shop monitor hanging bracket required for the job. For instance, open-joist ceilings often require Unistrut integration to bridge gaps between beams. Concrete slabs demand heavy-duty wedge anchors. Drop ceilings require specialized false-ceiling adapters. These essential adapters transfer the heavy load to the true structural ceiling hidden above the fragile acoustic tiles. You can never anchor a ceiling mounted retail screen directly to a drop grid. The thin metal grid will bend, collapse, and cause catastrophic hardware failure.
Weight and wind load assumptions also play a critical role in structural readiness. You must provide the exact weight of the displays to your installer. Do not guess or estimate. Additionally, you must account for potential drafts. Heavy storefront door traffic creates significant indoor wind shear. High winds entering the store cause hanging hardware to swing. This constant vibration stresses the mounting points over time, leading to metal fatigue.
Best Practices for Structural Assessment
- Photograph the ceiling structure above the drop grid during your initial site survey.
- Locate the nearest structural I-beam or concrete joist.
- Measure the exact drop distance from the true ceiling to the finished ceiling.
Ceiling Composition and Hardware Chart
| Ceiling Composition Type | Common Application | Required Mounting Hardware Integration | Load Bearing Capacity Risk |
| Drop Ceiling (Acoustic Tile) | Standard mall retail stores | Extension columns with structural ceiling adapters | High Risk (Grid cannot bear weight) |
| Exposed Open-Joist | Boutique or industrial style shops | Unistrut channels and beam clamps | Low Risk (If clamped to main beams) |
| Solid Concrete Slab | Street-level flagship stores | Wedge anchors and concrete base plates | Low Risk (Extremely secure base) |
| Plaster / Drywall (Finished) | Historic building storefronts | Toggle bolts (lightweight only) or joist tracking | Medium Risk (Must locate wooden studs) |
![Hanging window display installation process]()
Electrical Compliance and Suspended Display Cable Routing
The "spaghetti cord" trap ruins premium digital displays. Visible power and HDMI cords instantly cheapen your brand image. Aesthetic risks are high when deploying storefront digital signage. Customers expect a floating, magical appearance. You must prioritize clean wire management to achieve this look.
To avoid visual clutter, plan your suspended display cable routing meticulously. Use methodologies like hollow suspension rods. These thick metal pipes hide bulky power cords entirely from public view. Alternatively, utilize specialized tension wires featuring integrated low-voltage channels. These minimalist cables deliver power and data invisibly. This keeps the storefront viewing area completely pristine and modern.
Power proximity presents another major logistical hurdle. Your setup requires a dedicated electrical receptacle installed directly above the mounting location. Standard commercial displays use 110V or 120V power. Running standard extension cords above drop ceilings violates local fire codes. The National Electrical Code (NEC) prohibits flexible cords hidden in structural voids. Doing this creates immense safety hazards and risks voiding your commercial insurance.
Finally, verify your data connectivity well before installation day. Will your screen rely on Wi-Fi? If so, you must conduct a wireless signal strength test right at the window glass. Thick metal window frames and treated glass often block wireless signals. If the signal drops or fluctuates, you need a hardwired Ethernet connection. Run this Cat6 line alongside your primary electrical drop to ensure continuous media playback.
Providing Accurate Storefront Installation Drawings
Clear documentation prevents major friction on installation day. You must provide comprehensive storefront installation drawings to all stakeholders. These detailed blueprints guide the technicians. They also satisfy nervous landlords and strict city inspectors.
Your technical drawings must detail several exact measurements. Include precise overhead mounting points. Note the exact requested distance from the display face to the window glass. Highlight the floor clearance beneath the hanging unit. Providing this data removes all guesswork for the installation crew.
Many commercial leases include strict window aesthetic guidelines. Property managers often require formal pre-approval for anything mounted within three feet of the storefront glass. Submitting professional, scaled drawings speeds up this approval process. It shows you respect the building's architectural rules and operating procedures.
Permitting and code compliance also demand close attention during the planning phase. Consider ADA (Americans with Disabilities Act) compliance first. Ensure the bottom edge of the hardware does not create a head-strike hazard. If pedestrians can walk beneath the unit, it must hang sufficiently high. Also, review local OSHA standards for safe overhead mounting. Technicians must know the site allows for compliant ladder placement without blocking emergency fire exits.
Common Mistakes in Drawing Documentation
- Omitting the finished floor elevation measurements.
- Forgetting to mark the exact location of the new ceiling power outlet.
- Failing to account for the depth of the mounting bracket itself.
- Ignoring overhead fire sprinklers that might block the hardware path.
Managing Environmental Variables: Heat, Glare, and Spacing
Window environments act like high-powered ovens. Thermal load and glass proximity require careful, scientific management. You must avoid the dreaded "greenhouse effect." Direct sunlight passes through the glass and traps heat around the electronics. If LCD crystals overheat, they undergo isotropic degradation. This causes ugly black blotches to appear on the screen.
Installers need to know the window's cardinal direction. South-facing and West-facing windows endure intense solar heat gain during peak afternoon hours. If your window faces south, you might need active cooling fans integrated into the mount. You will certainly need specific spacing from the glass to allow convective airflow. A minimum gap allows hot air to escape upward.
Screen brightness must also successfully compete against ambient light. Check the NIT rating of your display hardware. Confirm it matches the expected direct sunlight exposure. Standard indoor screens turn completely dark in the afternoon sun. High-brightness models solve this visibility issue, but installers must angle the mount correctly. Proper downward angling mitigates surface glare from passing cars and streetlights.
Access and clearance make or break the actual installation schedule. Technicians need physical space for tall A-frame ladders or motorized scissor lifts. Ensure store staff temporarily removes existing window merchandise. They must also strip away temporary vinyl window graphics before the crew arrives. Clearing the physical path ensures the technicians can work safely and efficiently.
Summary Comparison: Environment Type vs. Required Mitigation
| Window Facing Direction | Solar Heat Risk | Minimum Recommended Brightness | Required Hardware Adjustments |
| North-Facing | Low | 1000 - 1500 NITs | Standard spacing, basic glare tilt. |
| East-Facing | Medium (Morning) | 2000 - 2500 NITs | Moderate spacing, timer-based brightness. |
| West-Facing | High (Late Afternoon) | 3000+ NITs | Large glass gap, thermal sensor activation. |
| South-Facing | Extreme (All Day) | 3500+ NITs | Maximum spacing, active cooling fans required. |
Conclusion
Successful execution always bridges the gap between hardware procurement and physical site readiness. Buying a premium display means nothing if the physical environment rejects it. By preparing structural assessments, mapping power drops, and controlling thermal variables, you protect your investment. You eliminate the hidden costs of aborted site visits and delayed marketing rollouts.
We highly recommend sharing this preparation checklist with potential AV integrators during your RFP process. Their response to these requirements will help you gauge their operational maturity. Professional teams will welcome your proactive documentation. Amateurs will ignore these details until they arrive on site.
Your next step is proactive communication. Download a pre-site survey template for your internal team. Contact a certified installation firm to review your architectural blueprints. By taking these steps today, you guarantee your storefront digital signage captures attention safely, beautifully, and exactly on schedule.
FAQ
Q: How far should a hanging window display be placed from the storefront glass?
A: Minimum clearance is typically 2 to 4 inches to allow for adequate airflow and prevent screen overheating, though this varies based on solar load and manufacturer specs. South-facing windows often require even larger gaps to prevent the greenhouse effect from damaging internal components.
Q: Can I mount a shop monitor hanging bracket directly to a drop ceiling grid?
A: No. Drop ceiling grids are not load-bearing for commercial displays. The bracket must be anchored to the true structural ceiling above the grid using extension columns or suspension cables. Attaching electronics directly to thin T-bars causes immediate ceiling collapse and safety hazards.
Q: Who is responsible for the electrical outlet installation?
A: Typically, a licensed commercial electrician must install the required ceiling receptacles before the AV installer arrives to mount and route the cables. AV technicians specialize in low-voltage data and hardware mounting, but rarely hold high-voltage municipal electrical licenses.
Q: Do I need special permits for a ceiling mounted retail screen?
A: It depends on local municipality codes and your lease agreement. Usually, landlord approval via certified installation drawings is required, and sometimes a low-voltage permit is needed depending on the city. Always check your specific commercial lease clauses regarding window modifications.